 Layer Manager
This video is part of the official comprehensive video course about Duik Ángela
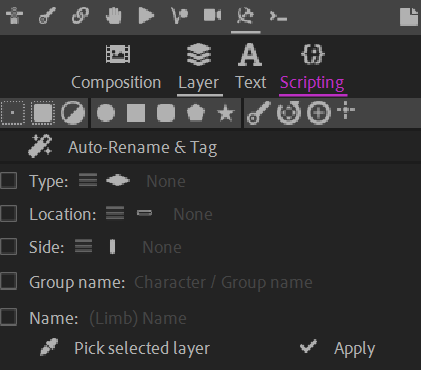
The layer manager is there to help you create, rename, and tag layers.
The layer tags set by Duik are actually markers on the first frame of the layer, showing the type of the layer and other useful information. They also contain more data hidden from the user but needed by some tools like the auto-rig.

The first line are quick buttons to create different kind of layers.
Null layer.
This creates a special Null layer made with a shape layer instead of a solid. This has two main advantages: it keeps the project panel tidy without adding to many items, and makes it possible to render the null layer if needed (by just unchecking the guide layer option).Solid.
Similarly to the null layer button, this creates a solid made with a shape layer and a simple rectangle. Another advantage here is that you can easily change its size with the size property of the rectangle, and its color can be animated.Adjustment layer.
Again, Duik uses a shape layer instead of a solid to create adjustment layers. The additional advantage here is that the content of the layer can be used as the alpha of the adjustment layer (i.e. a mask for the effects).Primitives.
The next buttons are a way to create primitive shapes perfectly centered in the composition with all their transform values initiated to0(or100 %for the scale and opacity).Duik bone 2 (custom armature).
Duik controller 3.
Duik zero 4.
Duik locator [^loc].
Tip
With a “shape solid” created with Duik, you can easily make sure it keeps the size of the composition, even when the composition is resized or if its copied and pasted in another composition. Just add this expression in the size property of the rectangle:
[thisComp.width, thisComp.height];
You can even easily make sure the solid’s size is a fraction of the composition size by multiplying this:
[thisComp.width, thisComp.height] * 0.5;
will set the solid to be half the size (a quarter of the area) of the composition.
The Auto-Rename and tag button is a smart tool which automatically sets the group, side, type, and name of the selected layers according to their original name. It detects words, prefixes and suffixes such as
L or Left, and separators such as _ or - to deduce all attributes which should be associated to the layer, then sets the correct tag and renames them according to the Duik naming scheme (the way Duik names the layers when it creates them).
You can use the last section of the panel to set specific attributes to the selected layers, or copy the attributes from one layer to others using the Pick selected layer button.
-
cf. Controllers. ↩
-
cf. Links and Constraints / Tools / Zero. ↩
-
cf. Links and Constraints / Tools / Locator. ↩