 Keyframe Tools

Design by Justine Cunha, animated by Duduf
The Animation panel contains all tools you may need all the time when in the process of animation.
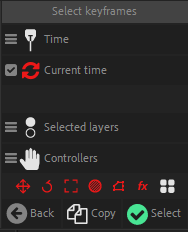
 Select Keyframes
Select keyframes… is a very useful tool to quickly select a lot of keyframes together in the timeline.

Options
-
You can select keyframes at a specific time or in a time range.
-
The time can be the time of the Current Time Indicator or a specific time, and the time range can be either the work area or a specific range.
To set specific time and time range, you can click on the eyedropper to pick the current values from the playhead or the work area. -
You can use the filters to select the keyframes of a specific type or on specific layers only.
 Interpolations

Just under the Select keyframes button, there are several tools to quickly adjust the interpolations of the selected keyframes.
- The first line of buttons can be used to change the interpolation type of the keyframes, or add keyframes of the wanted type on the properties. With the first button on the left, you can switch between the ‘Edit’ mode and the ‘Add key’ mode.
- In Standard Mode (only), you can manage some interpolation presets, which store and reset velocity and ease.
- The two sliders and the percentage adjust the ease on the selected keyframes, while the value just below defines the velocity.
Spatial Interpolations

These four buttons are a quick access to the different types of spatial interpolations. The “Fix” button automatically fixes the bad trajectory sometimes generated when you duplicate keyframes. It does so by detecting spatial tangents which should not be there, for example when two successive keyframes are exactly at the same place but with tangents between them.