Temporal Interpolation
This video is part of the official comprehensive video course about Duik Ángela

The second part of the animation panel contains several temporal interpolation tools. It’s where you can quickly add or edit keyframe types, and quickly set the easing values or even copy and paste them.

Le praxinoscope à projection de M. Reynaud,
La Nature, revue des sciences,
Louis Poyet, 1882
Public domain.
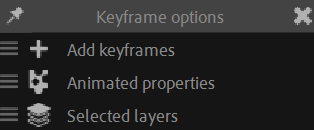
Add / Edit keyframes

The first line of the temporal interpolation section lets you very quickly create or edit keyframe types.
You can switch between the add or edit mode in the ![]() options.
options.
Edit keyframes
- Select a bunch of keyframes.
- Click one of the buttons to set the type of keyframe interpolation to the selection.
Note
When setting a type with Bézier interpolation (![]() ,
, ![]() or
or ![]() ), the keyframe ease uses the values of the sliders, and not the default After Effects values.
), the keyframe ease uses the values of the sliders, and not the default After Effects values.
Add keyframes
- Select some properties
- Click one of the buttons to add keyframes with the corresponding interpolation type.
By default, Duik adds keyframes on all animated properties it’ll find, but you can set it to only add keyframes on explicitly selected properties if you prefer.
By default, Duik works only with selected layers, but you can tell it to use all layers; in this case it’ll add keyframes in all properties of the composition, no matter the selection. Be careful, this may be a bit long if there are a lot of animated properties.
Edit keyframe ease
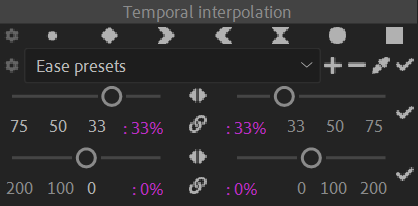
The second part of the temporal interpolation section is a keyframe ease editor, used to quickly adjust the keyframe ease on selected keyframes very quickly.
In After Effects, the keyframe ease, which actually controls the Bézier interpolation between keyframes, consists in two values:
- The influence controls what would be the length of the tangent of the Bézier curve in the graph editor; for horizontal tangents (i.e. with
0velocity), it directly controls the acceleration (ease out) and deceleration (ease in) of the motion around the keyframe. - The velocity is a signed value controlling the speed of the motion before (ease in) and after (ease out) the keyframe; the sign of the value tells the direction of the movement. In the graph editor, it is the angle of the tangents controlling the Bézier curve.
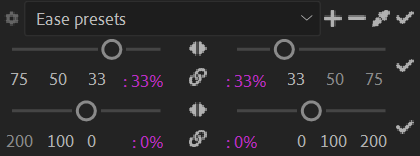
The first line with the dropdown menu let’s you quickly apply, add or remove easing presets.
Below are two groups of two sliders.
The first group sets the influence, the second group sets the velocity.
The sliders on the left-hand side set the ease in (before the keyframe), the sliders on the right-hand side set the ease out (after the keyframe)1.
The three ![]() apply buttons set the easing values to the selected keyframes; the first one sets both the influence and velocity, while the two others can be used to set only the influence or only the velocity.
apply buttons set the easing values to the selected keyframes; the first one sets both the influence and velocity, while the two others can be used to set only the influence or only the velocity.
Tip
Actually, you don’t really need the ![]() apply buttons, except to apply already existing values to other keyframes: as soon as you edit the value of one of the sliders, it’s automatically applied on the selected keyframes.
apply buttons, except to apply already existing values to other keyframes: as soon as you edit the value of one of the sliders, it’s automatically applied on the selected keyframes.
Velocities
In After Effects, velocities are an absolute value, which depends on the property where it is used. In can be in pixels per second for spatial properties, or in degrees per second for angles, etc.
Duik uses a value relative to the velocity of a linear interpolation, given in percent, which is automatically converted to and from After Effects absolute velocities. This allows to copy and set the interpolation from any keyframe to any other keyframe on any property.
With this system:
0 %velocity means no velocity.100 %is the equivalent of the continuous mode of After Effects:
It’s the velocity of a linear interpolation.-100 %is the same as above but going in the other direction.
Copy and paste keyframe ease values
- Select a keyframe.
- Click the
 pick button.
The influence and velocity values are set on the sliders. - Select the destination keyframes.
- Click one of the
 apply buttons.
Presets
- Select some keyframes
- Select the preset in the dropdown menu
The preset values are automatically set on the sliders below - You can further apply these values with the apply buttons.
To add a preset, set the values you need with the four sliders then click the ![]() add button.
add button.
To remove a preset, select it in the list and click the ![]() remove button.
remove button.
-
To the contrary of other animation software, in After Effects the interpolation is set on a single keyframe, around it, and “in” means arriving in the keyframe, before it, “out” means getting out of the keyframe, after it. That’s what’s called the keyframe ease.
In other animation software, the interpolation is defined between two keyframes (which is more logical and makes more sense mathematically speaking: there can’t be any interpolation for a single keyframe, one always needs at least two keyframes to interpolate).
In this latter case, “in” means getting in the interpolation, that is after the first keyframe, what After Effects would call “ease out”, and “out” is the opposite, what After Effects would call “ease in”. ¯\(ツ)/¯ ↩